FastCompressor App
Offline batch compression
If you run a WordPress site that's been live for a year or more, your wp-content/uploads/ folder has almost certainly grown into something difficult to manage. Years of blog posts, product images, and page assets stack up into thousands of files spread across deeply nested date-based subdirectories.
The problem isn't just storage. Large, unoptimized images slow down your site in ways that caching plugins and CDNs can only partially fix. But the obvious solutions — image optimization plugins, online compressors, bulk resizers — all come with trade-offs that become serious when your media library is already live.
This guide focuses on a specific, often-overlooked workflow: optimizing an existing WordPress uploads folder locally, preserving its structure and filenames, and putting it back.
The Two Different WordPress Image Problems
Before diving in, it's worth drawing a line between two situations that look similar but require different approaches.
Problem 1: Optimizing new images before you upload them. You have a batch of images sitting in a folder on your computer that you're about to add to a post or page. You optimize them first, then upload them to your media library. This is straightforward and covered in detail on FastCompressor's WordPress compression guide.
Problem 2: Optimizing images that are already on your server.
Your site has been running for years. You have 3,000 (or 30,000) images already living inside wp-content/uploads/. You want to reduce their file sizes without touching their filenames or folder paths — because WordPress's database and every piece of content on your site already knows exactly where those files are.
This article focuses on Problem 2.
Why This Is Harder Than It Looks
When images are already published and your WordPress database has recorded their paths, optimizing them retroactively has a constraint that pre-upload optimization doesn't: you cannot change the filename or the folder path.
WordPress stores image URLs in multiple places:
- The
wp_poststable, embedded directly in post content as<img src="..."> - The
wp_postmetatable, in attachment metadata and featured image references - Theme template files that reference media
- CSS files with
background-imagedeclarations - Third-party plugin tables that cache attachment URLs
If you rename a file from product-image.jpg to product-image-compressed.jpg, or move it from uploads/2024/03/ to uploads/optimized/2024/03/, every one of those references becomes a broken link. The image simply disappears from your site.
This is why the typical advice to "just use a plugin" is appealing — a plugin running server-side can update the database while it optimizes. But plugins have their own problems at scale.
The Problem With Plugins for Large Libraries
WordPress image optimization plugins (Smush, Imagify, ShortPixel, and their competitors) work by processing files through a cloud API. That means:
- Every image leaves your server and travels to a third-party system for processing
- Most plans impose monthly compression quotas — 50 or 100 images per month on free tiers
- A library of 10,000 images means months of processing (or a significant subscription cost)
- Images containing private content — client work, unreleased products, confidential assets — are uploaded to infrastructure you don't control
For a developer maintaining a site with a large, already-established media library, these constraints become real blockers quickly.
Can I Optimize My WordPress Uploads Folder Without a Plugin?
Yes. The plugin-based approach is not the only option.
The plugin-free workflow separates the optimization step from the WordPress environment entirely:
- You download the
wp-content/uploads/folder to your local machine - You optimize the images locally — on your own hardware, with no files leaving your machine
- You upload the optimized folder back to the server, replacing the originals
The key requirement is that the tool you use for local optimization must preserve the exact folder structure and filenames. If your original uploads folder has:
uploads/
  2024/
    01/
      product-shot.jpg
    03/
      hero-banner.png
  2025/
    06/
      about-team.webp
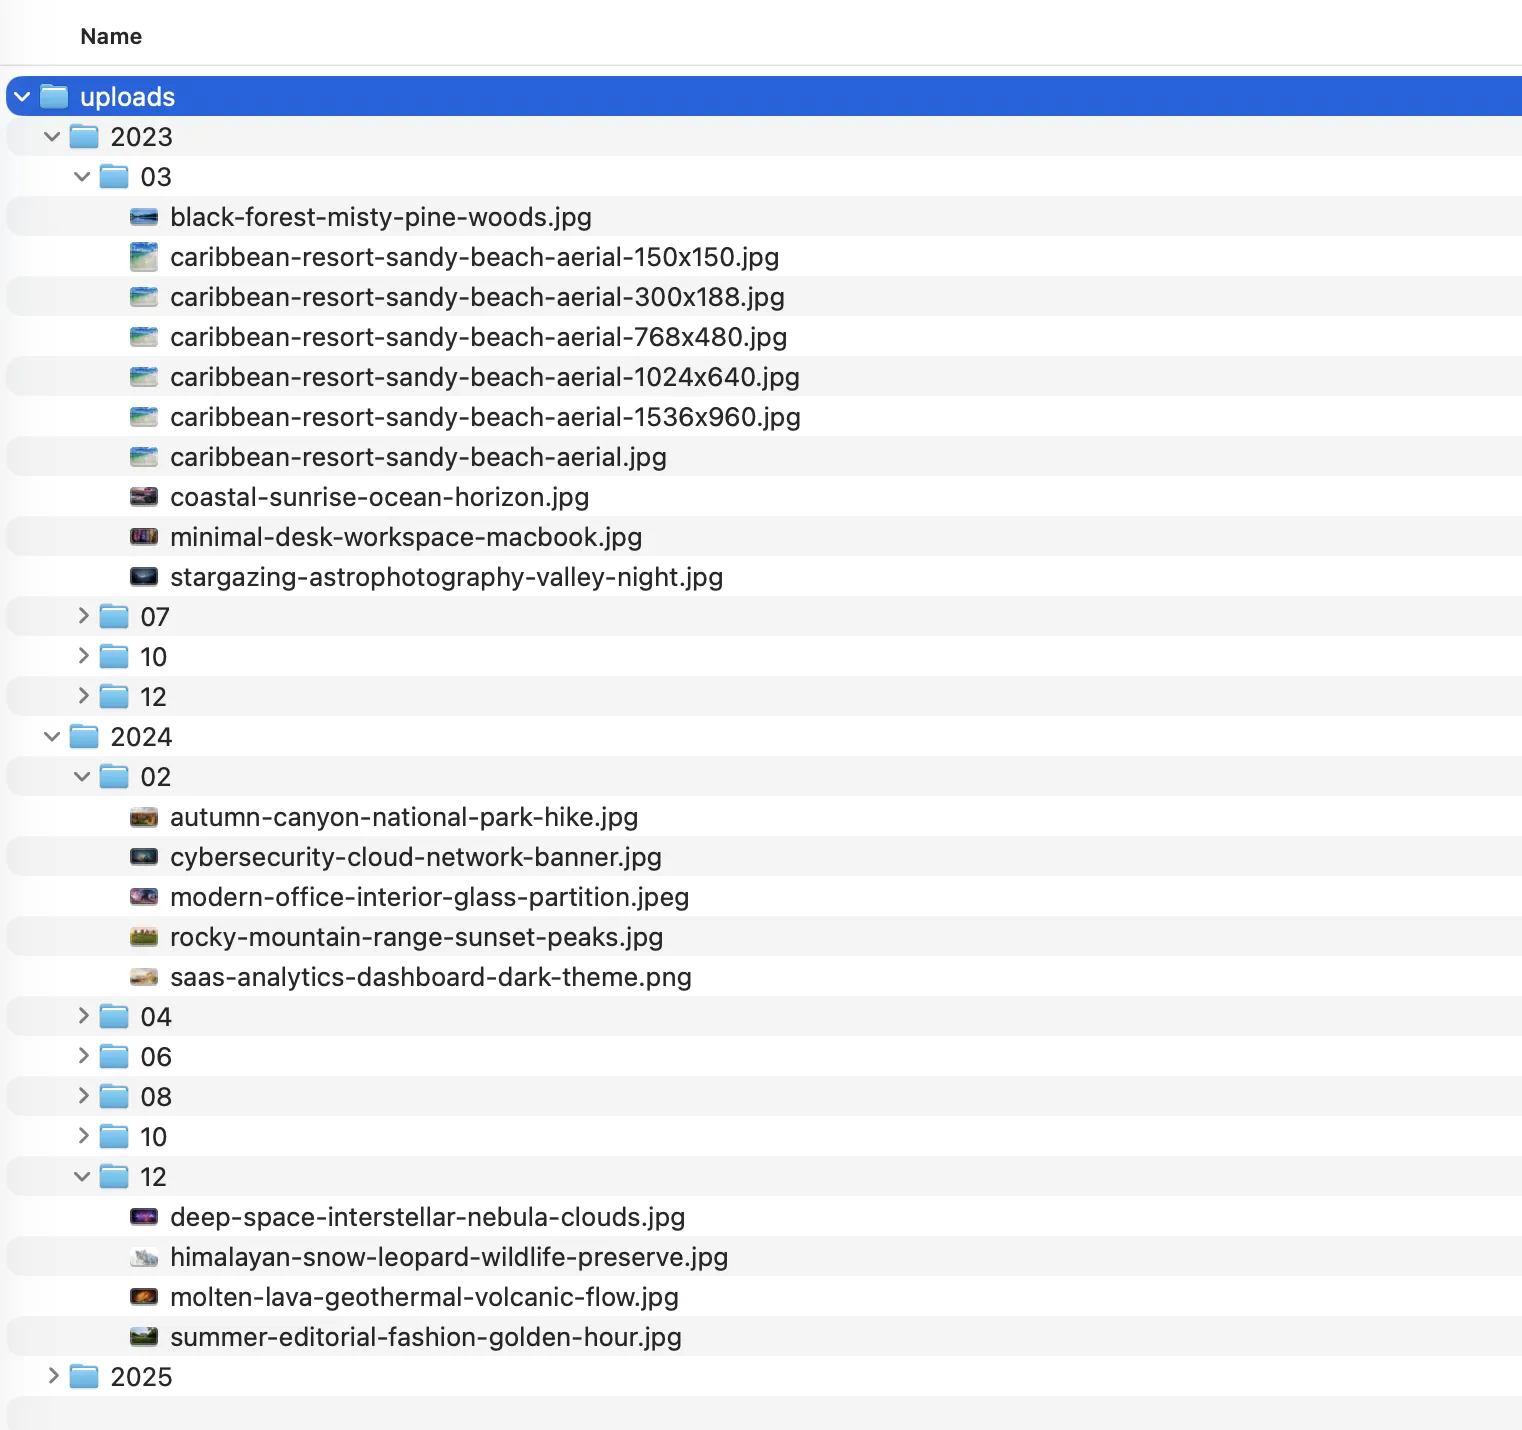
Figure 1: Standard wp-content/uploads/ directory hierarchy in macOS Finder showing year and month subdirectories alongside WordPress-generated responsive thumbnail sizes.
Then after optimization it must look exactly the same — same directory names, same filenames, same nesting. The only thing that changes is the byte size of each file.
Achieving this with a general-purpose image editor or online compressor is painful because most don't natively preserve recursive folder hierarchies. You'd need to manually reconstruct the folder structure, which defeats the purpose when dealing with thousands of files.
The Workflow: Step-by-Step Local Optimization
Here is the exact end-to-end process to optimize your existing WordPress media library without risking broken image links:
Step 1: Download & Back Up Your Uploads Directory
First, download the wp-content/uploads/ folder from your web server to your local workstation. You can use SFTP (FileZilla, Cyberduck, or Transmit), rsync over SSH, or your hosting provider's file manager:
# Example SFTP/rsync download to local machine
rsync -avzP [email protected]:/var/www/html/wp-content/uploads/ ~/Downloads/wordpress-uploads/
Critical Safety Step: Make an untouched backup copy of this folder before running any tools on it. Keep
uploads-backup/stored safely on an external drive or cloud backup.
Step 2: Open the Folder in FastCompressor
Launch FastCompressor and drag the entire uploads/ folder directly into the application window.
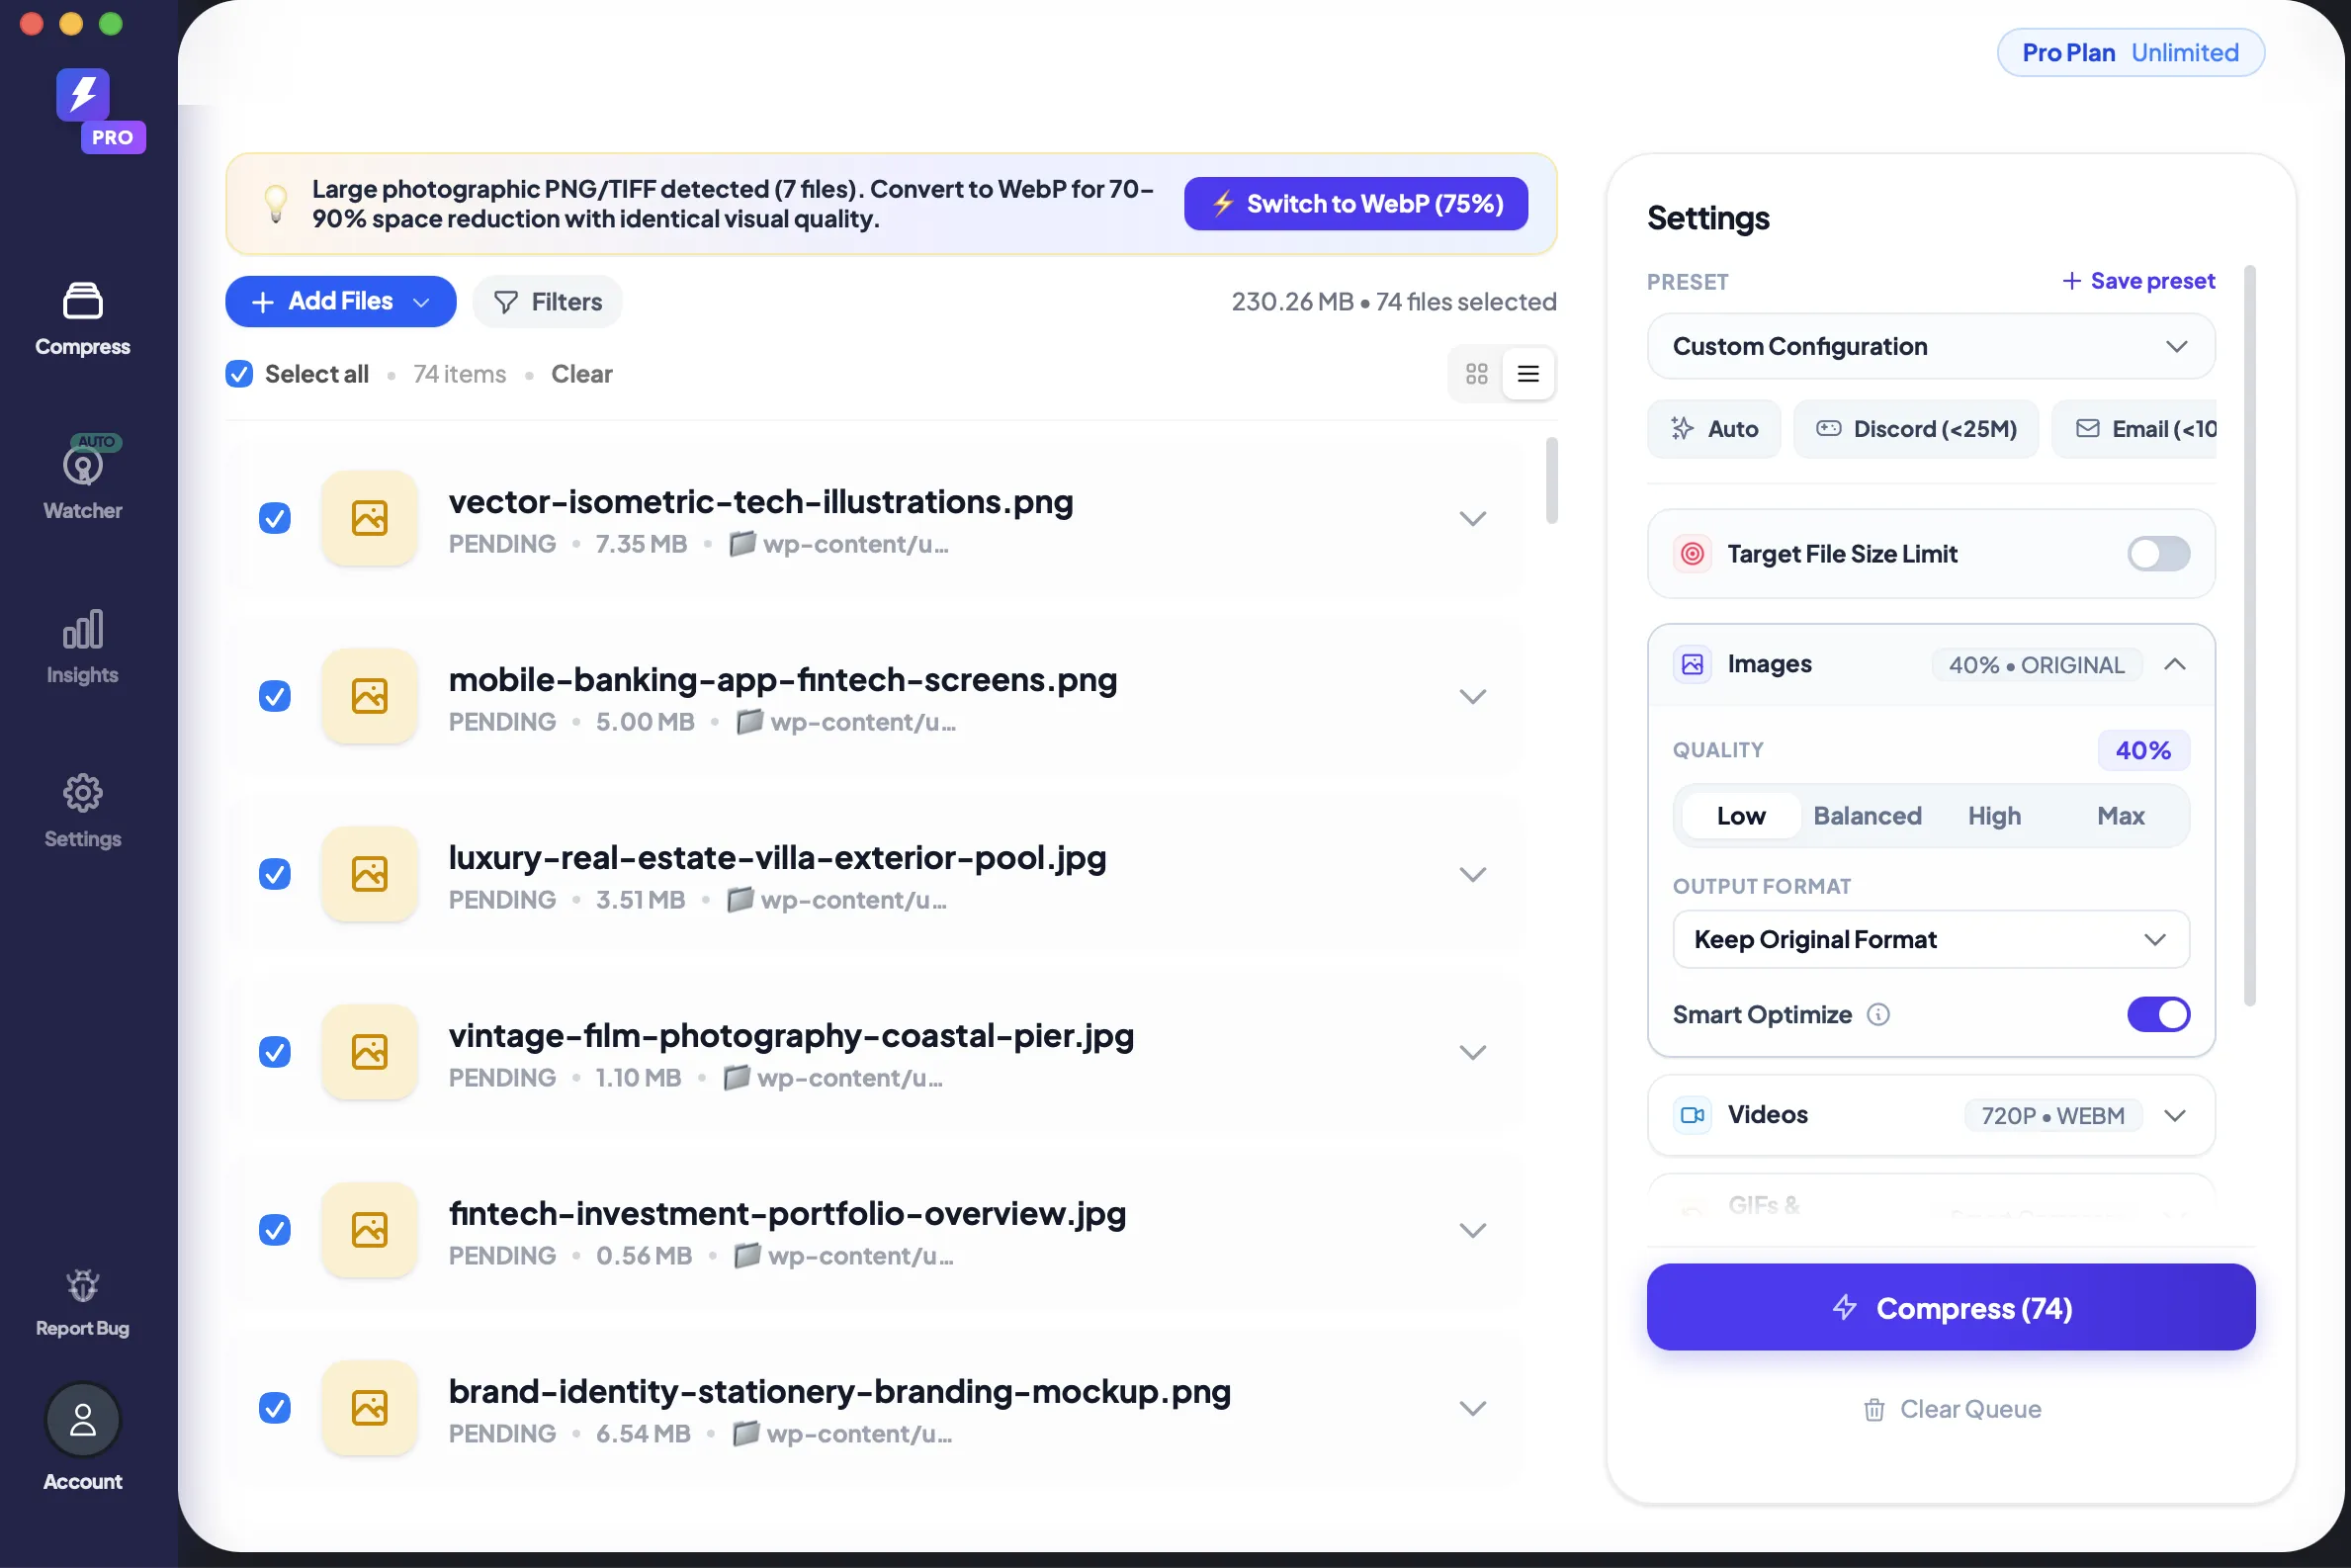
Figure 2: Dropping the wp-content/uploads/ directory directly into FastCompressor. The app recursively indexes all files across nested subfolders while preserving their relative paths.
FastCompressor immediately scans the folder recursively. Whether you have 70 images or 20,000 images spread across 48 date-based subfolders, the app indexes every subfolder level automatically without arbitrary file count limits.
- Output Format: Set to "Keep Original Format" (JPEG stays JPEG, PNG stays PNG) to guarantee zero URL alterations in your database.
- Compression Mode: Choose Balanced or High depending on your quality needs.
- Smart Optimize: Keep enabled for lossless metadata stripping and perceptual optimization.
Step 3: Choose "Export to New Folder (Preserve Structure)"
Click the primary action button to configure your output destination. FastCompressor opens the Select Output Folder modal:
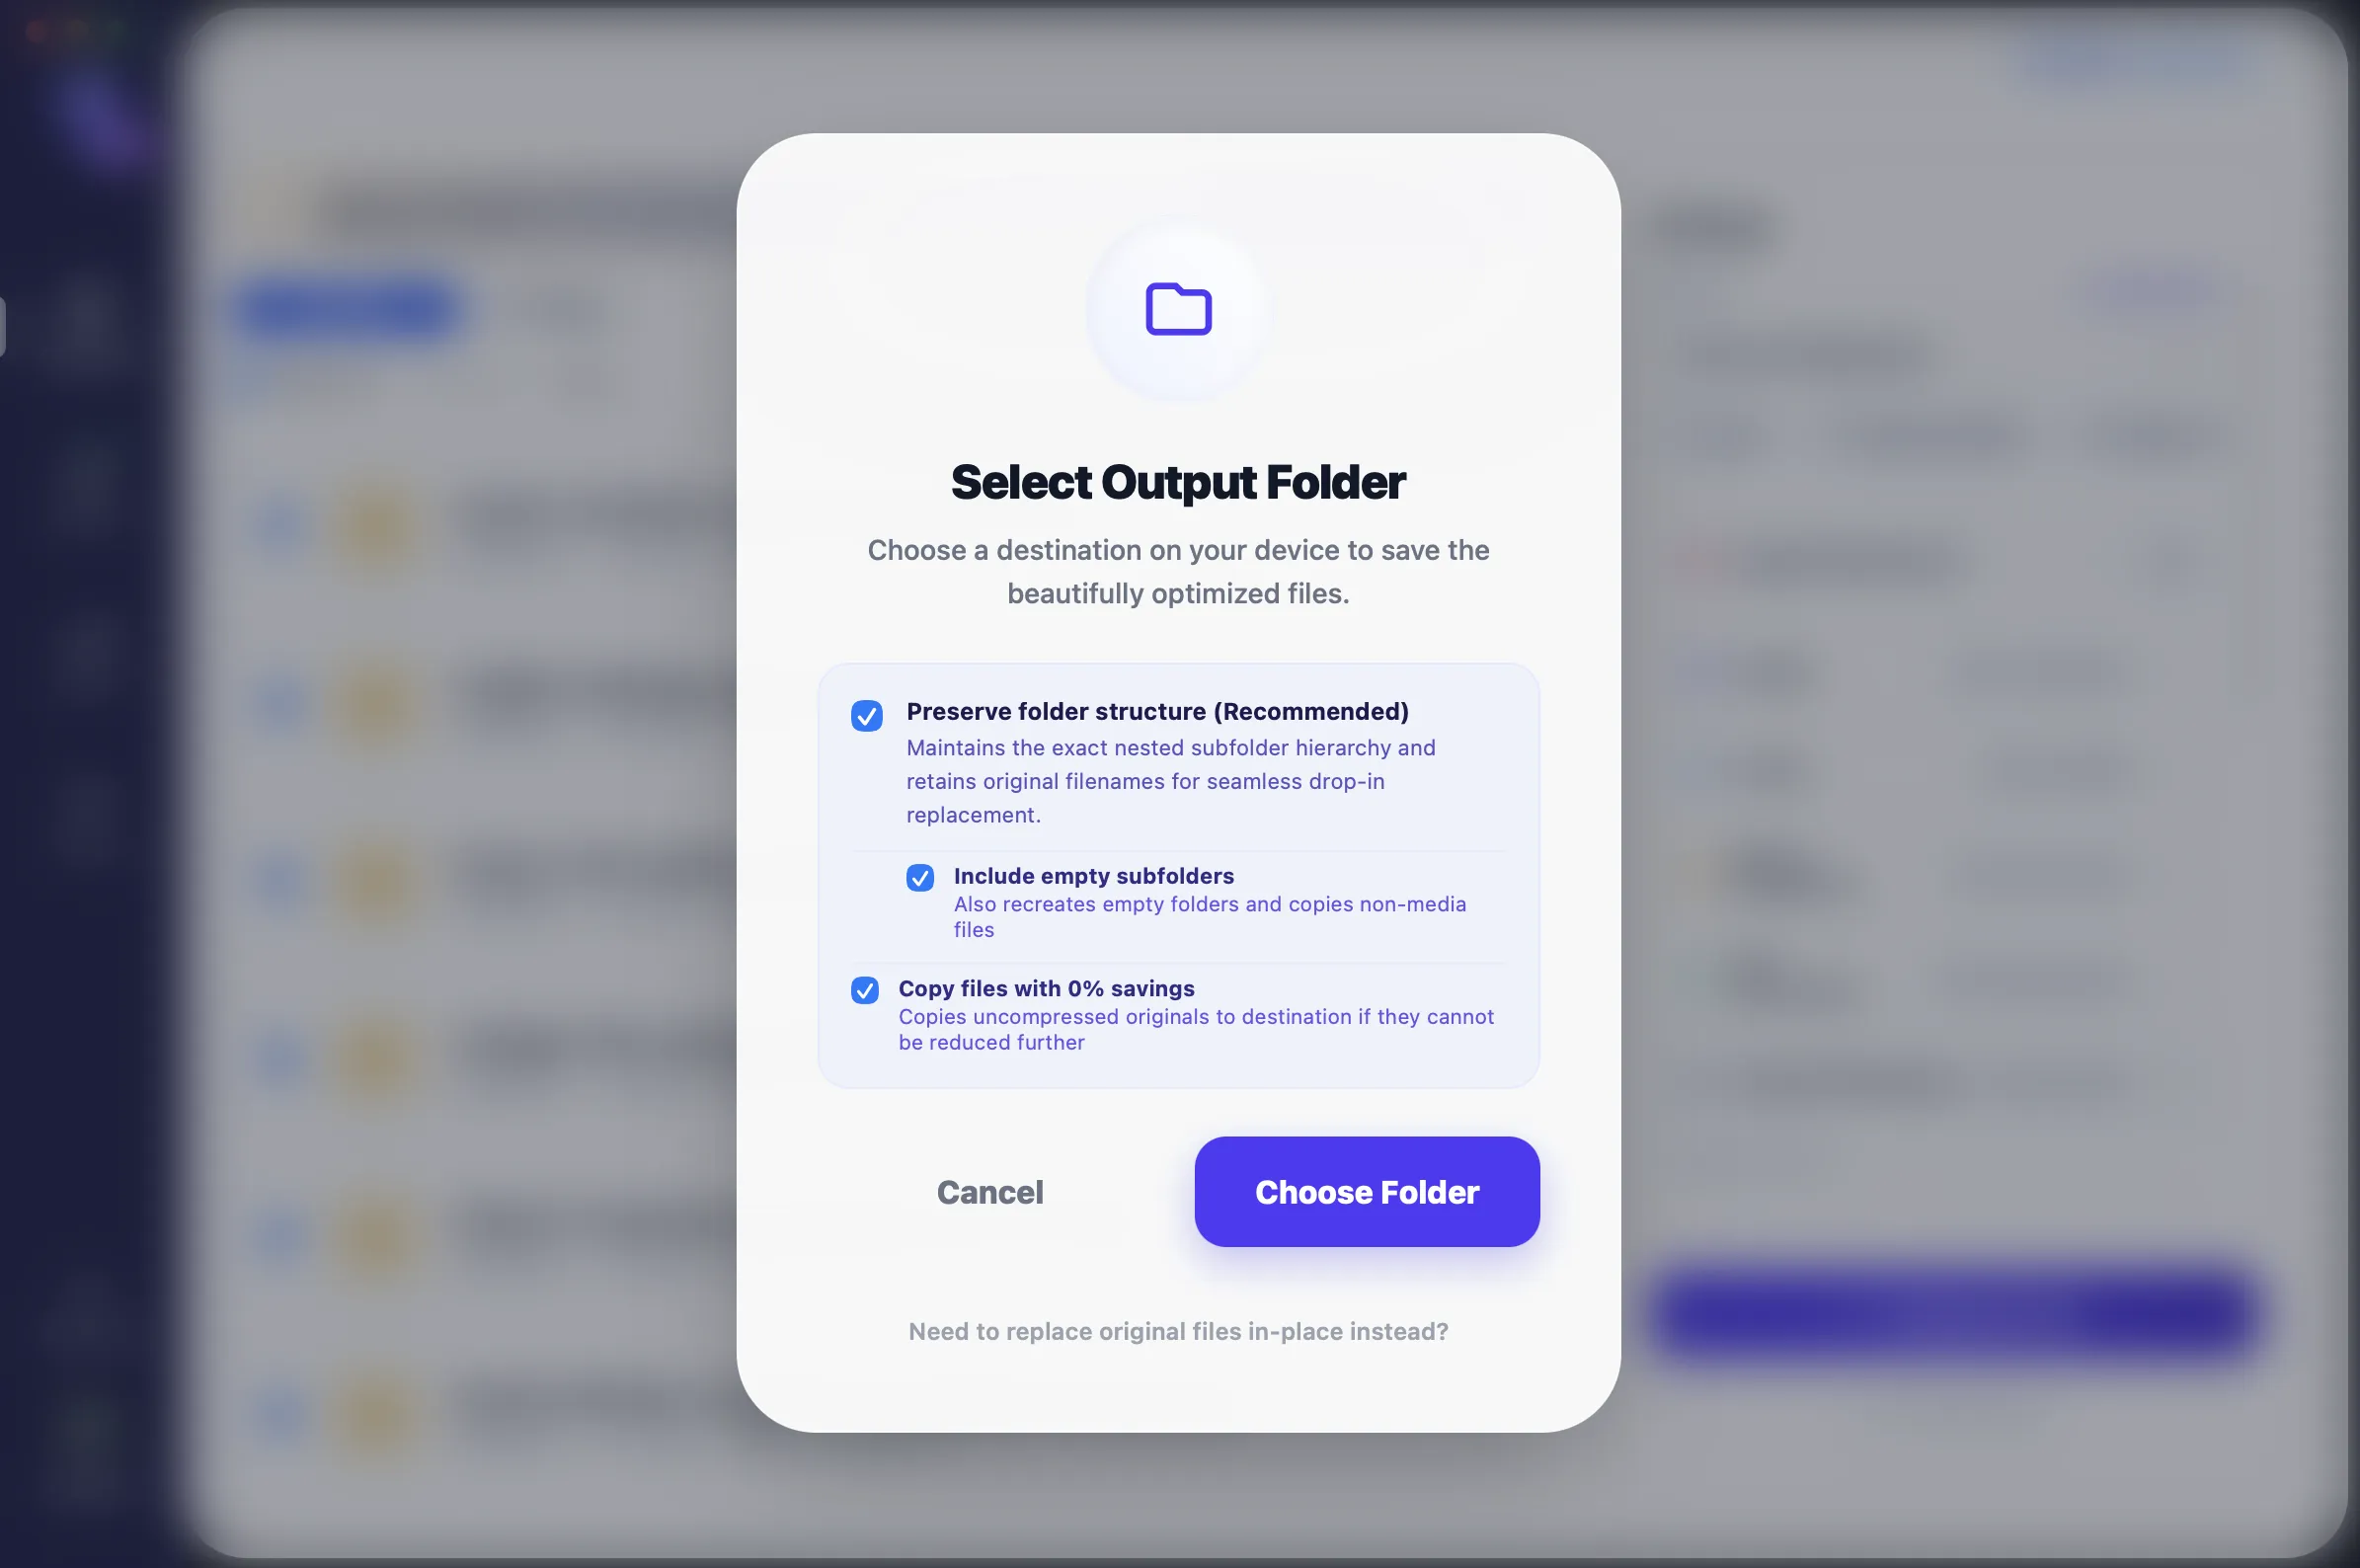
Figure 3: Selecting "Export to New Folder" with "Preserve folder structure (Recommended)", "Include empty subfolders", and "Copy files with 0% savings" enabled.
Make sure the following safeguards are checked:
- Preserve folder structure (Recommended): Maintains the exact nested subfolder hierarchy and retains original filenames for seamless drop-in replacement.
- Include empty subfolders: Recreates any empty directories and copies non-media assets.
- Copy files with 0% savings (Zero-Savings Guard): Copies uncompressed originals to the destination if they are already optimal and cannot be reduced further. This guarantees the exported directory is a complete 1:1 replacement.
Step 4: Run Compression & Review the Output
Click Choose Folder and select an export destination (such as wordpress-uploads-compressed/). FastCompressor leverages all available CPU cores to process files in parallel:
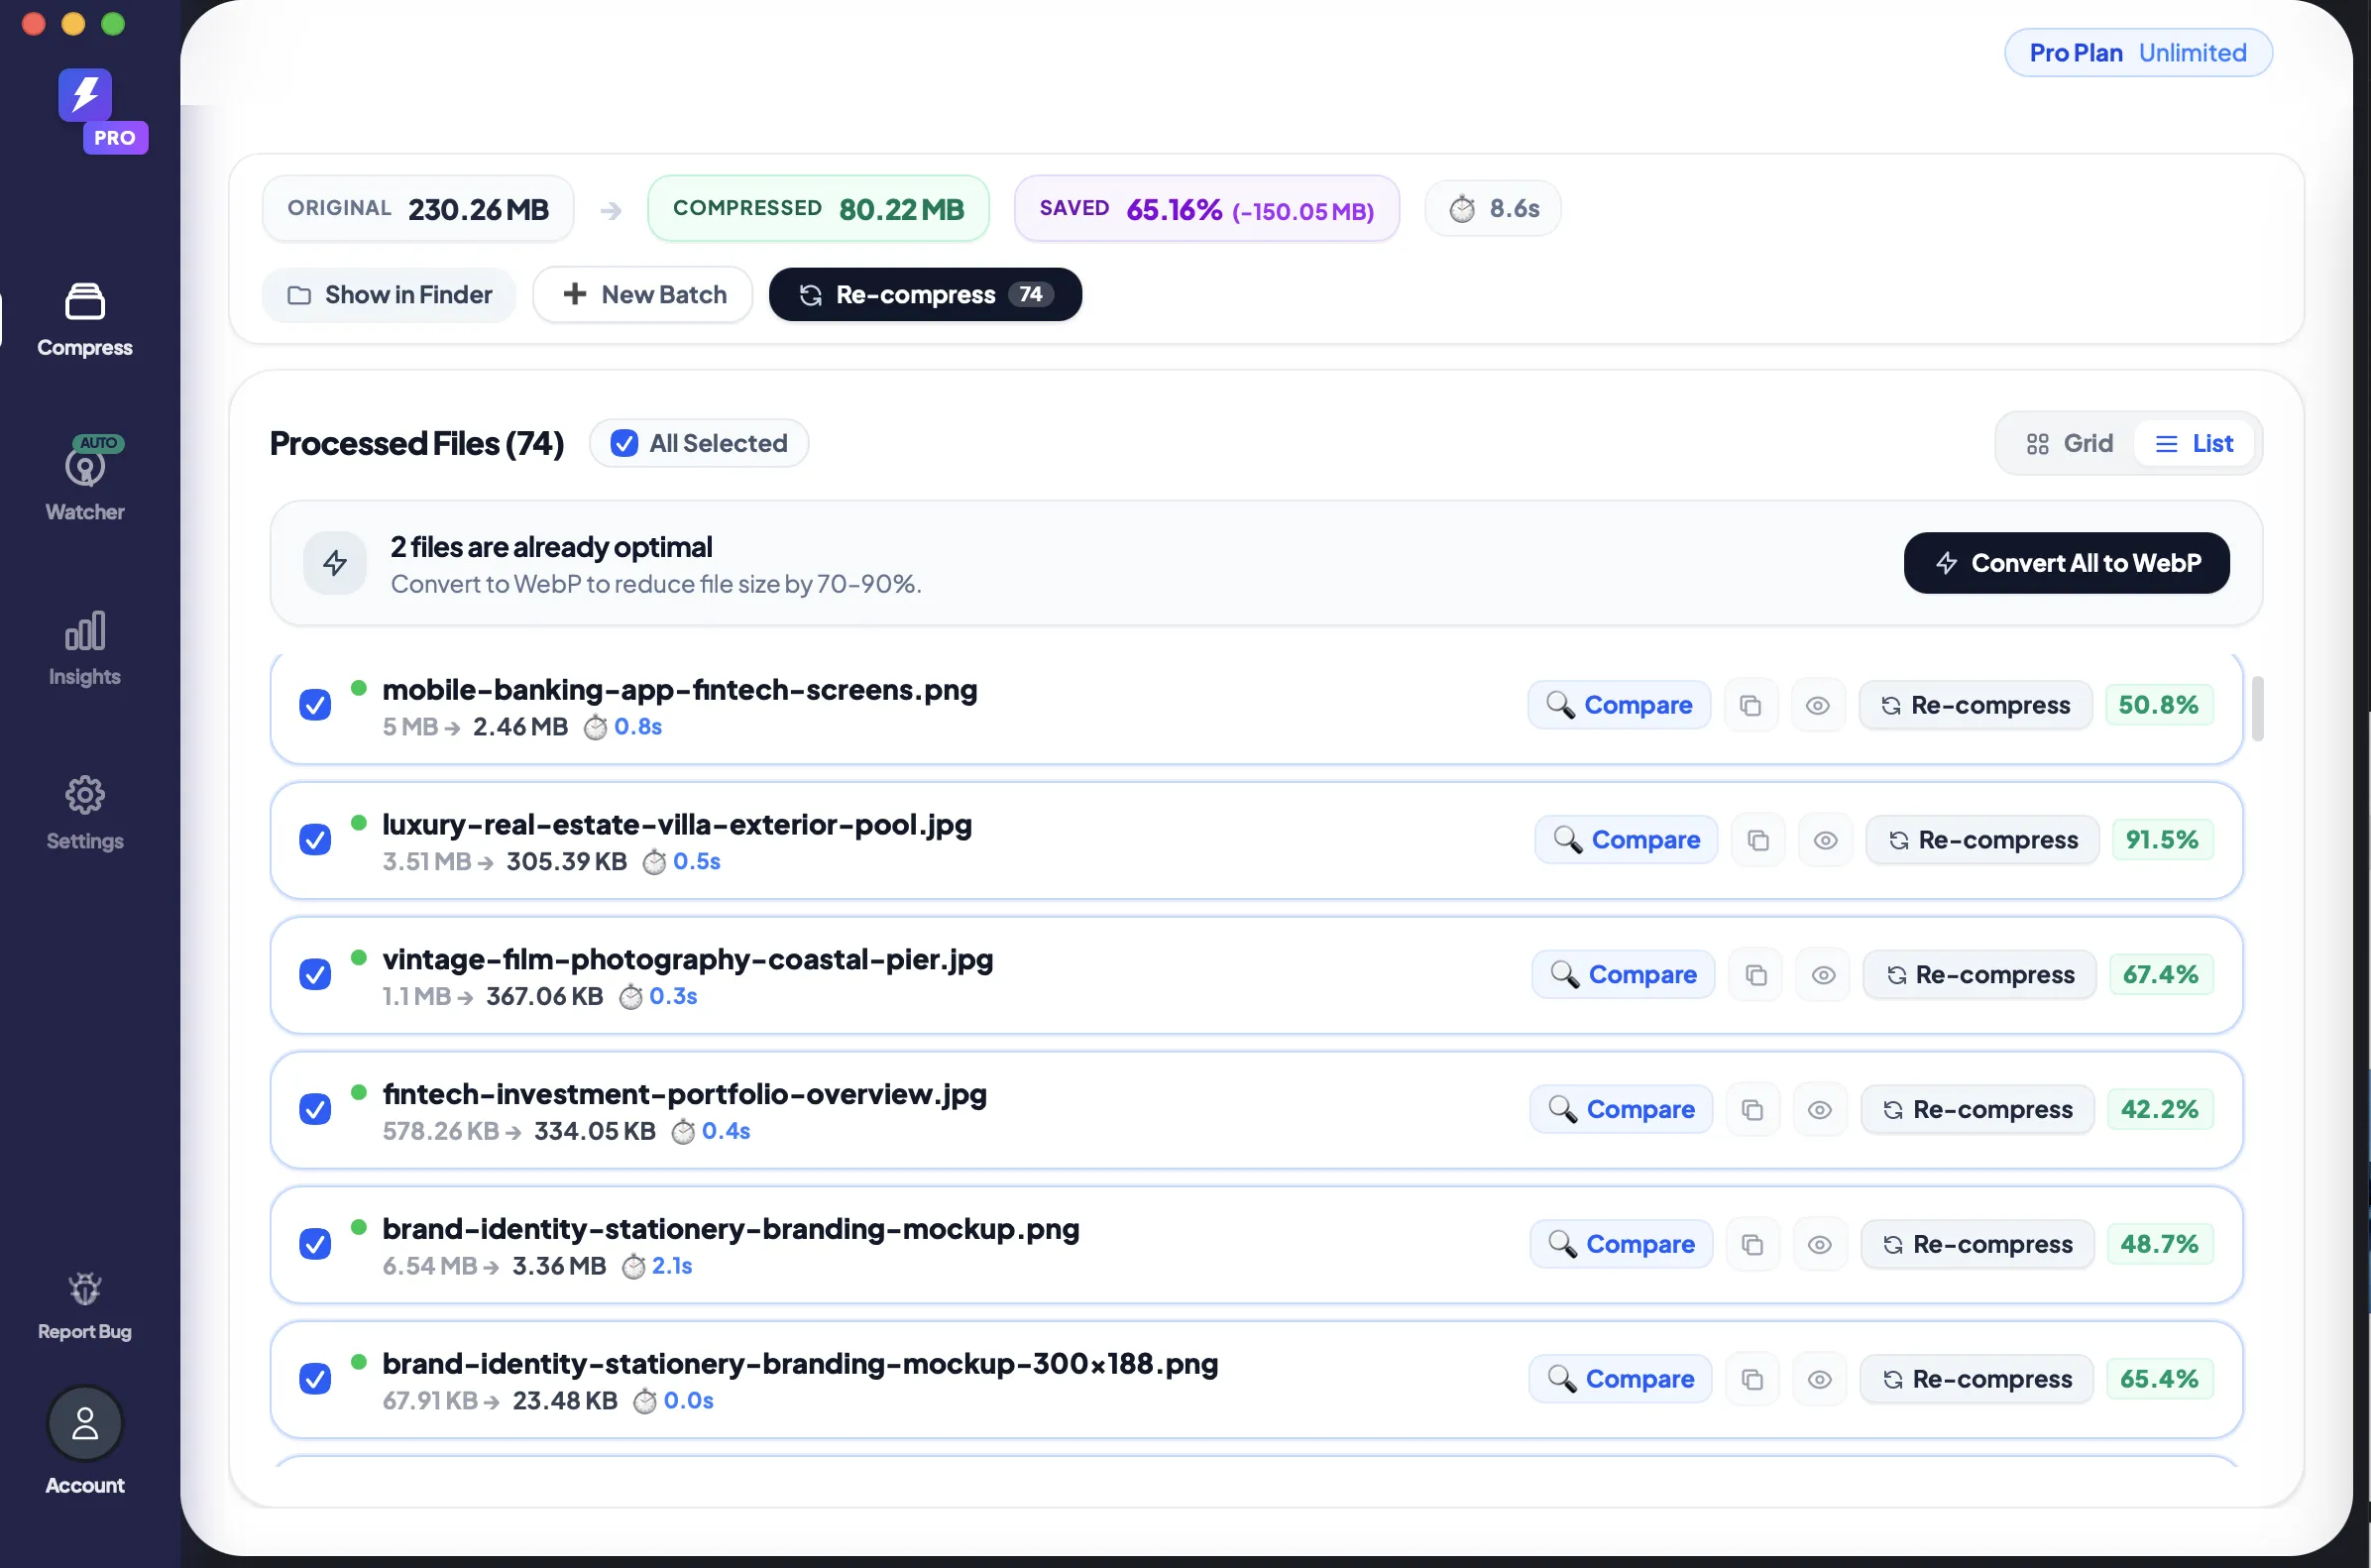
Figure 4: FastCompressor batch compression results: 230.26 MB compressed down to 80.22 MB (a 65.16% reduction) in just 8.6 seconds, with 2 optimal files automatically preserved by the Zero-Savings Guard.
In this test batch:
- Original Size: 230.26 MB
- Compressed Size: 80.22 MB
- Total Saved: 65.16% (-150.05 MB)
- Processing Time: 8.6 seconds total
- Zero-Savings Guard: 2 files were detected as already optimal and left untouched.
Now inspect the output folder in your file manager:
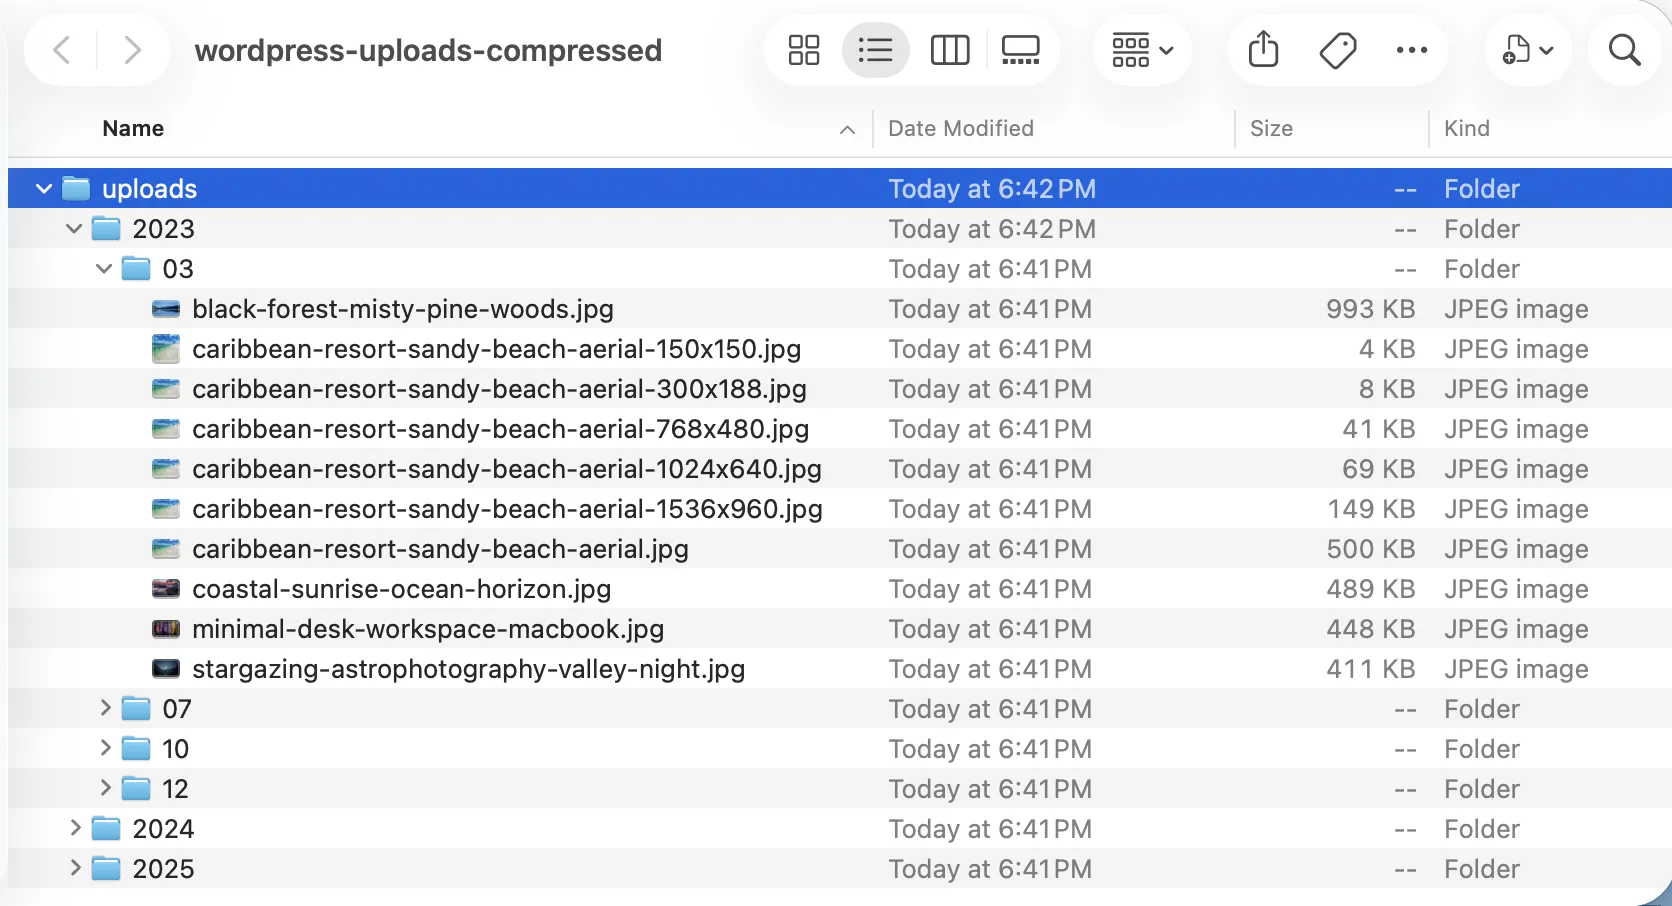
Figure 5: The exported wordpress-uploads-compressed/ folder in Finder. Every nested subfolder and filename remains identical, with significantly smaller file sizes.
Notice that every single path (uploads/2023/03/caribbean-resort-sandy-beach-aerial.jpg, etc.) matches the source folder byte-for-byte in structure and name.
Step 5: Upload Back to Your Server
Once you have verified the exported folder, upload it back to your server via SFTP or rsync, replacing the contents of wp-content/uploads/:
# Example rsync upload back to server replacing originals
rsync -avzP ~/Downloads/wordpress-uploads-compressed/ [email protected]:/var/www/html/wp-content/uploads/
Because every file path and filename remains unchanged:
- Every
<img>tag inwp_postsresolves immediately - Every featured image reference in
wp_postmetaremains valid - All Open Graph and social share previews continue working
- Your pages load significantly faster with 60%–70% less image payload!
A Concrete Example
Suppose your site has this path baked into an existing post:
/wp-content/uploads/2025/08/product-image.jpg
After running this workflow, that exact path still exists on the server. The URL is unchanged. WordPress doesn't know anything has happened. The file is just smaller:
/uploads/2025/08/product-image.jpg— 890 KB original/uploads/2025/08/product-image.jpg— 340 KB optimized (61% smaller)
Same path. Smaller file. Zero broken links.
A Practical Example at Scale
Consider a WordPress e-commerce site that has been running for four years. It has accumulated roughly 12,000 product images, category banners, and blog post assets spread across 48 monthly subdirectories inside wp-content/uploads/.
Without local bulk processing, the options are:
- Process them individually (impractical at 12,000 files)
- Use a plugin with a monthly quota (months of waiting on a free plan)
- Upload everything to an online compressor (privacy risk, often limited to single files)
With a local folder-based workflow:
- Download the uploads folder via FTP (or sync via rclone from object storage)
- Drop the root
uploads/directory into a local compression tool - Let it process recursively — all 48 date subdirectories, all 12,000 files
- The output replicates the original hierarchy exactly
- Upload the optimized folder back as a direct replacement
Note: actual compression results vary by image type, original quality, and chosen output format. The numbers above are illustrative only.
How FastCompressor Handles This
FastCompressor is a local desktop application (macOS, Windows, Linux) built for exactly this kind of bulk, folder-based workflow.
When you drop an entire uploads/ folder into FastCompressor, it:
- Processes all files recursively across every nested subdirectory
- Runs entirely on your local machine — no files are uploaded to any server
- Supports JPG, PNG, WebP, AVIF, HEIC, and more
- Handles large batches without file count limits
Have thousands of images already sitting on your WordPress server? Optimize the entire uploads folder locally with FastCompressor. Download FastCompressor
Export to New Folder (Recommended)
FastCompressor's Export to New Folder mode replicates the exact subfolder hierarchy of your input in the output directory. Filenames are retained without any suffix or modification. Any file that cannot be further compressed — because it's already well-optimized or the re-encoded output would be larger — is copied byte-for-byte to the output folder. This prevents missing files in the exported directory.
This is the recommended approach: inspect the optimized output folder before touching your live server, then replace the originals only when you're satisfied.
Optimize In-Place
FastCompressor also offers an Optimize In-Place mode that overwrites the original files directly. This is faster but permanent — if you later want to re-process with different settings, the originals are gone.
Before running in-place optimization, the app shows a confirmation modal explaining the risk. Back up your uploads folder first regardless of which mode you use.
Important Caveats: What This Workflow Doesn't Guarantee
Preserving filenames and paths significantly reduces the risk of broken image URLs, but it's not a complete safety guarantee. Before you run this workflow on a live site, understand the following:
1. Back up the uploads folder first
This is non-negotiable. Copy the entire wp-content/uploads/ directory to a safe location before replacing anything on the server.
2. WordPress generates multiple thumbnail sizes
When you upload an image to WordPress, it automatically generates several resized versions alongside the original (e.g., product-image-300x200.jpg, product-image-150x150.jpg). These thumbnails live in the same date subdirectory.
FastCompressor will process them recursively along with the originals. But if your optimization changes image dimensions rather than just quality (which it shouldn't in a preserve-paths workflow), thumbnail dimensions could become mismatched.
Stick to quality-based compression without resizing when optimizing an existing uploads folder.
3. Plugin-generated files
Some plugins generate custom derivative files in the uploads folder (e.g., WooCommerce product gallery thumbnails, plugin-specific image sizes). These get processed too — which is usually fine, but it's worth knowing they're in scope.
4. Only replace files when the optimized version is actually smaller
FastCompressor's Zero-Savings Guard handles this automatically: it skips any file where re-encoding would result in a larger output. But if you're using a different tool, make sure it has this safeguard — replacing a 400 KB image with a 420 KB "compressed" version is worse than doing nothing.
5. Test before going live
After uploading the optimized folder to a staging or dev copy of your site, spot-check several pages across the site before replacing files on the production server.
Pre-Flight Checklist
Before running this workflow on a production uploads folder:
- Full backup of
wp-content/uploads/completed - Database backup completed (in case manual URL repair is ever needed)
- Optimization configured for quality adjustment only — no dimension changes
- Output folder structure verified against original before uploading to server
- Tested on a staging site first (recommended)
- Confirmed the tool copies files it cannot further compress (no missing files in output)
Frequently Asked Questions
Can I compress an existing WordPress Media Library?
Yes. Download the wp-content/uploads/ folder, optimize the images locally with a tool that preserves folder structure and filenames, and upload the optimized folder back to the server. WordPress image URLs won't change as long as the filenames and directory paths remain identical.
Can I optimize the wp-content/uploads folder?
Yes. The key is using a local compression tool that processes folders recursively and replicates the original subfolder hierarchy in its output — so that uploads/2024/03/hero.jpg stays at uploads/2024/03/hero.jpg after optimization.
Can I compress WordPress images without a plugin?
Yes. The plugin approach is one option, but it's not the only one. Downloading the uploads folder, optimizing locally on your desktop, and reuploading is a plugin-free alternative that works regardless of your hosting environment, doesn't impose monthly quotas, and keeps your images on your own hardware.
Will compressing images change their URLs?
Not if you preserve filenames and folder paths. WordPress image URLs are derived from the file's location inside wp-content/uploads/ and its filename. As long as those don't change, the URL stays the same.
Can I bulk optimize thousands of WordPress images?
Yes — with a local desktop tool that supports recursive folder processing. Tools designed for individual files or small batches become impractical quickly. FastCompressor processes entire folder trees in a single pass with no file count limit.
Can I preserve the WordPress uploads folder structure?
Yes. Tools like FastCompressor offer an "Export to New Folder" mode that replicates the original directory hierarchy in the output — preserving every nested subdirectory and every filename.
Should I replace the original WordPress images?
Only after verifying the optimized output. The recommended workflow is to export to a new folder first, inspect the results, and then replace the originals on the server. Keep a backup of the originals regardless.
Is local image compression useful for private or client images?
Yes — this is one of the stronger arguments for local compression over plugin-based cloud compression. With a local workflow, images never leave your machine or your server. Client photos, unreleased products, and confidential assets aren't transmitted to a third-party service during optimization.
What should I back up before optimizing my uploads folder?
Back up both the wp-content/uploads/ directory and your WordPress database. The database backup is a precaution — if something does go wrong with paths, you'll have the URL references available for repair. Most hosting providers offer one-click backups, or you can use plugins like UpdraftPlus before running any bulk file operations.
Conclusion
Optimizing a large, existing WordPress media library is a different challenge from pre-upload compression. The constraint — preserving the URL structure that WordPress and its database already depend on — rules out most tools that rename files or change folder hierarchies.
The local folder workflow described in this article is practical at scale: download the uploads directory, process it recursively with a tool that preserves structure and filenames, and upload the optimized result back. The images on your site get smaller; the URLs stay the same.
If your site has hundreds or thousands of existing images that have never been optimized, this is one of the most impactful things you can do for page load performance — and it doesn't require a plugin, a cloud subscription, or a monthly image quota.
Have thousands of images already sitting on your WordPress server? Optimize the entire uploads folder locally with FastCompressor — no plugins, no cloud uploads, no file limit.
Download FastCompressor — Available for macOS, Windows, and Linux.
Related reading: FastCompressor for WordPress developers · Bulk image compression for agencies · Download FastCompressor
Get the Desktop App Link
Enter your email and we'll send you the download link — open it on your Mac or PC.
We'll send the link and a demo video. That's it.